Showing posts with label Baby. Show all posts

Wednesday, January 27, 2016

Colors to Lift Your Spirits - Starting with Green

Although winter temperatures and trees bare of leaves will still be with us in the northern hemisphere for another month or so, I am now starting to knit colors for spring. These two hats are made with fuzzy yarns from my stash, one of them adorned with a pink heart for that little girl somewhere in a migrant welcome center in Berlin.
Spring Green Hat for a Baby
I used the Emily Ocker cast-on and German Short Rows for the earflaps. Adding a new color when knitting in the round: "jogless" is what you want so see this tutorial on how to joing a new color to your hat. I-cords and a little heart-shaped button - and the hats were ready to start their travels. For more helpful hints click here
and go to bottom of posts.


Spring Green Hat for a Toddler

O how I long again to see
The vernal face of Spring,
And hear, from every budding tree,
Some little warbler sing.

I long to see the forest trees
Clothed in their robes of green,
And swaying in the gentle breeze
Display their glossy sheen.

I long to wander by the stream
Where sport the speckled trout,
Or in the noontide's genial gleam
See lambkins frisk about.

I long to see the sons of toil
Perform the noble deed
Of breaking up the stubborn soil
To plant the fertile seed.
 

I long to see the meadows green
Bespread with flowerets gay--
I long to have a change of scene
From winter cold and gray.

It won't be long--a little while
And snows will disappear
And Flora with her winning smile
Shall find a welcome here.

A poem by S. Moore (Canada)

Tuesday, May 21, 2013

Visits from my grandson

There is always the need of clothing for babies! A friend of mine is expecting her child at the end of the summer and I thought a light-weight bonnet would be something practical to have:


The bonnet is made of cotton yarn, crochet hook 3,5 (E-4). A crochet fan pattern, and the edge outlined with simple dc/sc stitches, using a fine contrasting yarn. The bonnet is closed with two ca. 25 cm ribbons, the chains made like a Solomon stitch crochet cast-on. E-mail me if you need more information. Need a suitable card for announcing the birth of a new baby? Here it is, in Cindy's blog Scherenschnitte - Papercuts. She lives in the US, does masterful papercuts, also on commission.

To my great joy and delight, I was able to see my grandson Victor for a week earlier this month. A four-year old boy, charming, lively, intensely interested in just about everything except going to bed. And maybe due to my steadily advancing age, and reflecting on the wars that have been going on for all the years in my life at some place or another in the world, I once again began comparing the life of present-day children, their environments and everyday happenings with mine so many years ago. How lucky many of us are, living in an area without hostile conflicts or worse.

I would like to enclose a link at the end of this post as an invite to KIVA. By accepting the invitation, you will not be asked to give sensitive information, especially no credit card number, in fact, you won't have to spend a single penny. A generous overall donor has provided a huge sum of loans from which you will receive US $ 25.00 earmarked to lend to a borrower of your choice, provided on KIVA list of borrowers. There is no financial involvement at all. Note: The sum of US$ 25.00 is paid back to the original overall donor.

And this is only half of it: by accepting the invitation, the account of the person sending the invite will also be credited with US $ 25.00 to lend to a borrower. Note:  again the loan will be paid back to the original overall donor.

There is simply no better offer around for you to make a difference. Click on the link below to register with your e-mail, select a borrower and click to accept the free loan. It will make a huge difference to the lives of many, especially to children.

Clicking on the link will not automatically get you involved in anything, just gives you more information!
So here is the LINK to first check out the details, click on "Free Trial" (still does not commit you to anything)  and in another step maybe accept the invitation - at no cost to you at all!

Thank you for reading this post.

(Here the link I try to include in every post: Helpful Tips and Links for Textile Crafters) Scroll post down to the end).

Wednesday, December 5, 2012

POP goes the Blanket

Blankets are loved by everybody. Most babies grow up with them. Blankets grow larger, adjusting to the growing child, then the child turns into an adult, needs a beautiful (or masculine!) blanket on the bed, for relaxing on the sofa, huddling under it against the chills of winter or use it summer outings to spread on it and read a book, have a picknick. Giving a blanket to a child one simply cannot go wrong. 

Tropical Pop Circles Blanket
My first gift to my grandson was a log cabin blanket, in two sizes, one for his crib and one to take on travels! The Hope Blanket was followed quickly by a light-weight swaddling blanket in a basket-weave pattern. The POP pattern by tincanknits makes a cheerful and warm comforting blanket, lap sized or just right to cover a sleeping baby.


The yarn: MC from Cascade while the Multicolor yarns are from a large range of Red Heart colors.
Both knit well, the Cascade maybe a bit difficult for impatient knitters. Why Tropical? The colors remind me of tropical flowers, birds and fish! For information on modifications please see my Ravelry page or go to bottom of this page. A lined version of the POP blanket can be seen by clicking on this link. To my delight, this lined baby blanket is now used for a baby boy in London, UK. Makes me happy!


A tutorial for the POP Blanket can be found at the TinCanKnits site, click here.
Here my notes from my Ravelry page:
Notes
BEWARE! THIS PATTERN IS HIGHLY ADDICTIVE !
Ordered the CC yarn at Jimmy Beans (USA), they are always very reliable and accommodating with the postage from the US to Europe!
Red Heart Boutique Treasure in the colors (from the top down):
1) Abstract / 2) Watercolors / 3) Horizon
The MC is from Cascade Yarns, Ecological Wool, in Natural. Purchased from Laine et Tricot (France).
Out of curiosity I ordered square dp needles from Jimmy Beans. Pattern starts with circular Emily Ocker CO : the square birchwood needles feel good, nice points, not at all cumbersome. Easy TV-knitting.
16 November 2012. Finished all squares.
Notes on this pattern.
1) Emily Ocker CO with MC “Boutique Treasure Yarn”
2) Increased stitch count by picking up the right leg of the stitch in the row BELOW the one you have on your left needle (not with kf&b and not by knitting into the bar between two stitches) to make a truly invisible increase, leaving no hole and no nub. Here is the best tutorial I could find for this technique, from TECHknitting. Changed to the bulky MC “Cascade” yarn in Round 12.
3) Knitting the corners: I knitted the individual corners by knitting forwards (knitting) and backwards (tinking), starting with the short-rows. The corners are very uniform this way plus I did not have to turn the work at all. Here is an excellent tutorial for this technique. After a couple of corners this really speeds up the corner-rows with every module, plus for me it improved the uniformity of stitch tension in those short rows.
In my next short-row project I will use the practical Japanese short-row method by Susanna i.e. described by Purlwise - replicating this German short-row method by Roxanne Richardson.
Another great short-row method is described here.
I used the German short-row method for my Wingspan and like the results.
4) Binding off: Used a crochet hook the size of the needles and made an sc-bind-off. As said in the very precise pattern, all left-over wrapped stitches are neatly taken care of during the bind-off. The 3 wrapped stitches are always in the second six stitches of one needle, you can’t miss them. Another trick for ensuring an elastic corner: yarn-over once before binding off the corner stitch, do NOT knit it but simply let it drop when you are past the corner. This way you have ample space to massage the finished corner into a nice flat edge for joining. Same applies for a crochet bind-off.
5) Blocking: I usef a plywood board and stainless steel nails outlining a square, hook in the stacked modules, about 8 at a time per square. Beneath the first square I placed cellophane (plastic from a shopping bag will do) to keep the square from getting stained. Then I covered the stack with a wet towel wrung dry. After 12 hours the modules are perfectly blocked and dry. Regretfully, I don’t have a blocking board. But with this method, I can block a couple of modules at the same time, depending on the thickness of the module, and inevitably they are all the same size :-)
6) Joining modules to make a blanket.
With the MC yarn, I crocheted the modules together, framing each one - looked tidier than my sewing efforts.
A very nice project - thank you tincanknits!
It reminded me of a beautiful blanket by Sophie Digard, a French designer.
Information on quantity: The 3 Red Heart Yarns skeins last for one 4x5 module blanket AND one 5x5 module blanket or two identical ones and 3 muffs (see muff link below). I needed not even one complete skein of MC Cascade Yarn for one blanket and I have about 1/3 of a skein left of the second one after having finished two blankets.
Ideas for leftover yarns: Knit modules for making a bag similar to this Motif bag. Used two modules each for knitting a muff - three altogether!
Click HERE for a tutorial by TinCanKnits.

7) Lining the blanket. This is a baby blanket and will probably be washed frequently. I found a lining always helps to keep a knitted blanket in shape and probably is easier on a baby’s sensitive skin. I used a German “Molton”, for UK/US knitters I would suggest a thin fleece or a thick flannel sheet. If new, wash and iron the fleece/flannel to avoid later shrinkage. Cut out a square/rectangle according to the dimensions of the blanket, adding about 1,5 cm (1 inch) all around.
Pin the fleece/flannel onto the blanket with great care so there are no folds or puckers - starting by pinning the four corners, then the sides and each center of the modules to the fleece/flannel lining. I secured the module centers on the lining with a firm cross-stitch. Then start sewing the lining to the blanket just before the edges, so the lining does not show when you look at the module side.
I used a narrow herringbone stitch for elasticity. I think the lining process is not much fun to do but it adds so much to the blanket, the weight is better and it probably outlasts the “baby stage” of the recipient in much better shape.
A nice tutorial for fabric lining a knit blanket is found here in the blog by Italian Dish Knits and for the stitch itself see this very detailed information in this blog by TECHKnitting.


Over fourty years ago I made a pink blanket for my newborn daughter Anne. At that time, we lived in the Windy City of Chicago at that time so warmth was essential for outings. Both of my girls had so-called Charlie-Brown type Security Blankets, which were called "Mogy" - a name invented and adopted from the children of a wonderful friend in Chicago whose two kids also had "Mogies". And when these Mogies were worn and washed and torn to shreds, their pieces were faithfully kept in boxes and amidst precious linen and lace. Bits of them were put into match boxes and mailed abroad to those of the children who spent some time abroad.

I also made a Bubble Blanket for Anne. On a wooden frame that I made to measure a bit wider than the buggy and almost just as long, I hammered in nails at regular intervals and closely together to make many small pompons.


 I layered pink yarn up and down and over and across around the nails, completing the criss-cross layering with a few white yarn layers. Then I tied all crossings tightly together with an non-untiable knot. Once this tedious part was done, I carefully cut with a pair of good scissors precisely 2 thirds of the yarn layers at every crossing right in the middle between two crossing layers, counting the thread layers that were to be left uncut. And POP by POP - the PomPoms were released! The blanket is light-weight and looks very special with a smiling baby under it! Now, the bubble blanket is For Sale.


Wool and cotton vie for their individual importants, but it is the weather and climate that will guide our choice. Blankets carry many names. I like the name comforters best because we associate blankets and covers generally with a comfort feeling. It is the first item that people in need will yearn for, a cup of hot tea and a blanket to get protected against the weather. Charity blankets carry love and caring all by themselves.
A blanket is a universal concept for a welcome gift, given with the understanding that one cares and wishes to help and learn about caring. A blanket can be made of rags and yet be welcome. Each step of making it is filled with thoughts of the recipient. Each step, stitch, module or circle is not just a part of the whole but an infinite shell holding loving thoughts of the kown or unknown recipient.

Thought of the day: There are pilgrimages like the Path of Saint Jacob. Or the Zen pilgrim path in Europe, developed by Dirk Beemster. I keep on pondering about the difference between the two paths. The goals intimated by the Saint Jacob's pilgrimage appear to be the path itself and getting absolution of sins upon reaching Santiago de Compostela. The Zen pilgrim path has no goal. It is a path for the here and now. It makes me smile to make a blanket for a baby, right here and now, it will eventually find its own recipient, somewhere...


Sunday, March 11, 2012

A Rose in Spring


The Christmas Rose, Helleborus, or Lenten Rose isn't really a rose, as we all know. Calling it a bit lowly in comparison? Certainly not! It bravely blooms at a time when we are especially in need of reminders that Spring will come again! My Christmas Rose, a Helleborus Orientalis, is from the garden of my great-grandmother. She had a wonderful large flower garden in the 1880s. This Christmas rose has a lovely purple color and faithfully appears every year, spreading into larger and larger circles if left undisturbed. One of these days I might even find a black Christmas rose (Helleborus niger), with its fascinating dark colors!


On the spur of the purple moment I started a lace project with a lovely hand-dyed yarn from Zauberglöckchen called Filigranissimo and one can tell immediately that it lives up to its name!

As I was getting into Spring mood, I started with destashing, uncluttering, weeding out of things long kept and mostly of high sentimental value. It is hard to let go. On the other hand, as one gets older, every thing we shed is also a relief. I am keeping mental images of things for as long as I can, or even take a picture now and then. I cannot part with the paintings of my children, nor their gifts and letters. Letters are one of the most personal things in life. One of the  disadvantages of e-mail, although I don't deplore the electronic communications development at all!

When I was young and the world was... well, it was different... it was half a century ago when my mother thought it quite indispensable for a gentleman to have fine linen handkerchiefs with a monogram and so she busied herself with building up a small trousseau for her son-in-law, which was actually quite forward thinking - why not a trousseau for the groom! She added monogrammed towels and shirts and linen and silver cutlery sets, and there was no doubt in her mind that throughout our entire life we would keep adding personalized items to our common household.

Our lovely Hélène, a very close friend of the family, gave birth to a healthy little boy and I could not but knit  up some little gifts. Here's the Bring Me Home Hat (pattern by Melynda Bernardi)       
                  

and a cute manly cardigan for little Axel! The pattern is from Whit's Knits from Purlbee. I love the way the simple knit stitch adds a bit of folksy yet handsome ruggedness to this baby cardigan.


Wednesday, March 18, 2009

Victor Harry


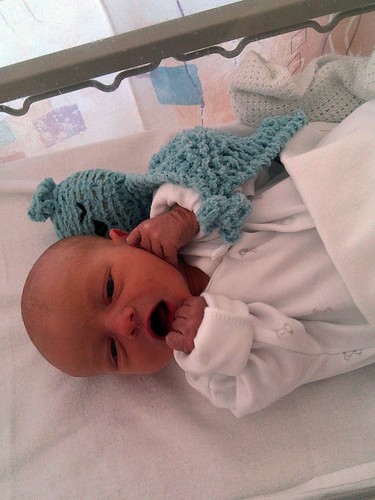
What can I say! Our first grandchild, Victor Harry, was born on
17 March 2009, St. Patrick's Day, just 10 minutes shy of midnight.
Everybody is very happy and very grateful.

Tuesday, February 24, 2009

Baby Blanket HOPE - for Joy


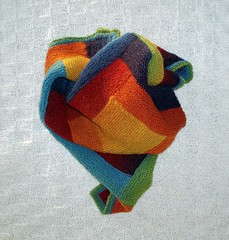
The Log Cabin Blanket is the pattern "How to Log Cabin" by Kay Gardiner and Ann Shayne, made with Kauni Effektgarn 8/2, Rainbow EQ, color scheme by Phazelia (Ravelry).
Please read the story behind this particular blanket on Ravelry. It was made as a gift to Joy, who gave us so much hope in difficult times.
Thank you Joy - hopefully your lovely baby daughter Holly will like the blanket!
"Dear Joy, you untiringly gave us hope when my husband suffered a stroke this May and gave him the strength to pursue his goal to walk again. You are expecting a baby - and with every stitch I knitted at the bedside of my husband I wove in our gratitude and hope - and so for us, your baby’s middle name will always be HOPE.
Thank you forever."
 Also read the story of  travel version of the magic Oma Blanket on the Lauragais project page on Ravelry or in this blog.

The white blanket is a Reversable Basket Weave Blanket
(by Chrissy O'Malley) with Wendy Pearl DK, a lovely soft yarn.

Monday, February 23, 2009

Getting close...

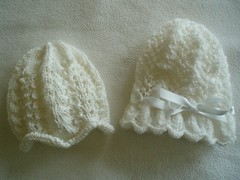
Two white baby bonnets completed last night - and the package is posted and on its way to the UK. The bonnet with the ribbon is Rose-of-Sharon pattern by Angela Hahn, for the other bonnet I used a regular feather and fan pattern.

Monday, February 2, 2009

Baby Pagoda Hats - White and Red


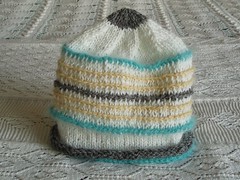
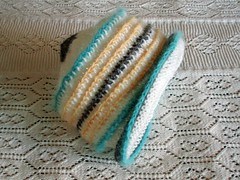
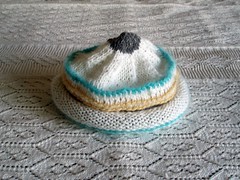
A Pagoda hat, folding in neat accordion-like sections, to add to our grandchild's layette.
Number of stitches for CO and decrease instructions are taken from Ulli S. Shibuya. Changes are mine. Reduce or enlarge CO in multiples of 8. All colors given are suggestions only, go ahead and dig deep into your stash!
CO 72 stitches, distribute evenly on 4 dpn or circular needle/s. Knit in the round for 8 rows in grey, then switch to white and knit another 8 rows. Crochet (dc UK; sc US; fM German) 1 round in turquoise. Knit 3 rounds in white. Crochet 1 round in yellow. Knit 2 rounds in white. Crochet 1 round in yellow. Knit 2 rounds in white. Crochet one round in grey. Knit 2 rounds in white. Crochet 1 round in yellow. Knit 2 rounds in white. Crochet 1 round in yellow. Knit 3 rounds in white. Crochet 1 round in turquoise. Knit 6 rounds in white.

Start decrease:
Round 1: *knit 2 tog, knit 6*, repeat8 times. Round 2: knit Round 3: *knit 2 tog, knit 5*, repeat 8 times. Round 4: knit round 5: *knit 2 tog, knit 4*, repeat 8 times. Round 6: knit
Decrease in the above manner, every second round with one stitch less in between the "knit 2 tog" until there are 18 stitches left. In the following round: "knit 2 tog" = 9 stitches left. Knit 1 round. Run thread through remaining 9 stitches, pull together and weave in thread.

Turn the Pagoda Hat inside out. Using turquoise, crochet one round of dc (sc, fM) into the first white blibs, which originated with the color change from grey to white. This will stabilize the edge, prevent it from rolling in further and keep the Pagoda Hat fitting snugly around the baby's head.


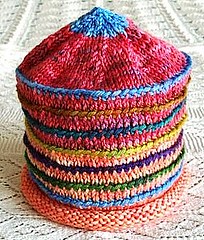
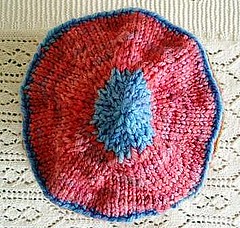
Another version of the Baby Pagoda Hat, this time in a happy pinkish red with colorful stripes. For a jogless color change see this very helpful tutorial by TechKnitting or here.

Baby Pagoda Hats - White and Red


A Pagoda hat, folding in neat accordion-like sections, to add to our grandchild's layette.
Number of stitches for CO and decrease instructions are taken from Ulli S. Shibuya. Changes are mine. Reduce or enlarge CO in multiples of 8. All colors given are suggestions only, go ahead and dig deep into your stash!
CO 72 stitches, distribute evenly on 4 dpn or circular needle/s. Knit in the round for 8 rows in grey, then switch to white and knit another 8 rows. Crochet (dc UK; sc US; fM German) 1 round in turquoise. Knit 3 rounds in white. Crochet 1 round in yellow. Knit 2 rounds in white. Crochet 1 round in yellow. Knit 2 rounds in white. Crochet one round in grey. Knit 2 rounds in white. Crochet 1 round in yellow. Knit 2 rounds in white. Crochet 1 round in yellow. Knit 3 rounds in white. Crochet 1 round in turquoise. Knit 6 rounds in white.

Start decrease:
Round 1: *knit 2 tog, knit 6*, repeat8 times. Round 2: knit Round 3: *knit 2 tog, knit 5*, repeat 8 times. Round 4: knit round 5: *knit 2 tog, knit 4*, repeat 8 times. Round 6: knit
Decrease in the above manner, every second round with one stitch less in between the "knit 2 tog" until there are 18 stitches left. In the following round: "knit 2 tog" = 9 stitches left. Knit 1 round. Run thread through remaining 9 stitches, pull together and weave in thread.

Turn the Pagoda Hat inside out. Using turquoise, crochet one round of dc (sc, fM) into the first white blibs, which originated with the color change from grey to white. This will stabilize the edge, prevent it from rolling in further and keep the Pagoda Hat fitting snugly around the baby's head.


Another version of the Baby Pagoda Hat, this time in a happy pinkish red with colorful stripes. For a jogless color change see this very helpful tutorial by TechKnitting or here.

Baby Pagoda Hats - White and Red


A Pagoda hat, folding in neat accordion-like sections, to add to our grandchild's layette.
Number of stitches for CO and decrease instructions are taken from Ulli S. Shibuya. Changes are mine. Reduce or enlarge CO in multiples of 8. All colors given are suggestions only, go ahead and dig deep into your stash!
CO 72 stitches, distribute evenly on 4 dpn or circular needle/s. Knit in the round for 8 rows in grey, then switch to white and knit another 8 rows. Crochet (dc UK; sc US; fM German) 1 round in turquoise. Knit 3 rounds in white. Crochet 1 round in yellow. Knit 2 rounds in white. Crochet 1 round in yellow. Knit 2 rounds in white. Crochet one round in grey. Knit 2 rounds in white. Crochet 1 round in yellow. Knit 2 rounds in white. Crochet 1 round in yellow. Knit 3 rounds in white. Crochet 1 round in turquoise. Knit 6 rounds in white.

Start decrease:
Round 1: *knit 2 tog, knit 6*, repeat8 times. Round 2: knit Round 3: *knit 2 tog, knit 5*, repeat 8 times. Round 4: knit round 5: *knit 2 tog, knit 4*, repeat 8 times. Round 6: knit
Decrease in the above manner, every second round with one stitch less in between the "knit 2 tog" until there are 18 stitches left. In the following round: "knit 2 tog" = 9 stitches left. Knit 1 round. Run thread through remaining 9 stitches, pull together and weave in thread.

Turn the Pagoda Hat inside out. Using turquoise, crochet one round of dc (sc, fM) into the first white blibs, which originated with the color change from grey to white. This will stabilize the edge, prevent it from rolling in further and keep the Pagoda Hat fitting snugly around the baby's head.


Another version of the Baby Pagoda Hat, this time in a happy pinkish red with colorful stripes. For a jogless color change see this very helpful tutorial by TechKnitting or here.

Thursday, January 8, 2009

Snowy booties


Yesterday's late night knitting coincided with snowfall - so this morning the finally finished tweedy booties (pattern by Susan B. Anderson) were subjected to their first test for cold temperatures and snow! They are to go with the grey Baby Surprise Jacket (Elizabeth Zimmermann), which is on the photo above and on flickr/Ravelry. The summer version in white might be worn indoors in a pinch...


link


Edited 8 February 2009:
Added another
pair of booties to use up
the Rowan yarn.


Edited 6 March, 2009: The Baby Tulip Jacket and Saartje's Booties


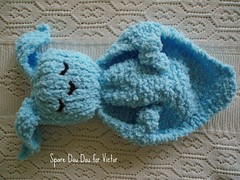
Baby Stuff: BSJ, Christening Hats, Booties (Page 81 booties), Bootie-Socks, Blanket Buddy, Aviatrix Hat, Rose-of-Sharon Hat, Manly Pebble Vest. (Helpful instructions on How to make faces in crochet/knit toys.)